Luma x21/x20 OvrC guide
OvrC gives you significant options without having to log in to each device’s interface.
This document assumes you have a solid understanding of how to use OvrC. If you are not comfortable with OvrC, click here for the full documentation.
- NVR Configure tab
- Camera Configure tab
- Camera Details tab
- PTZ Camera settings
- Fisheye settings
- Multi-site management
NVR Configure tab
You can customize the NVR by clicking on it under the Devices page and navigating to the Configure tab.
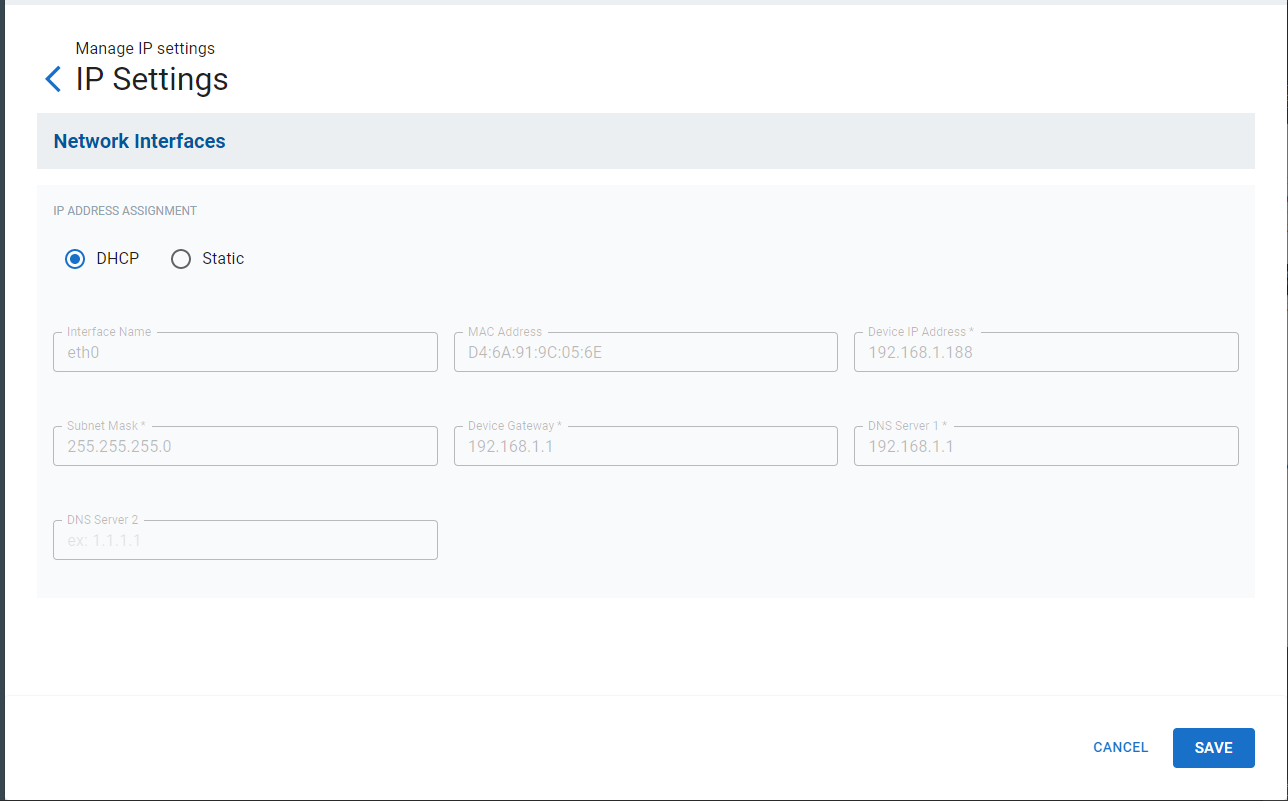
IP Settings
Here you can change the NVR’s IP address between DHCP and static. We recommend keeping this set to DHCP and handling all IP addresses through the router.
Time Settings
In this section you choose the time zone for the NVR. This affects the time as it appears on channel feeds.
Channel Settings
This page displays all of the NVR’s channels. You can directly edit the channel name here. This changes the camera name that shows on the OSD. It does not change the name of the camera as shown in OvrC’s device list.
Disk Management
This lists details of each hard drive in the NVR. If you have installed a new hard drive, you can format it for use by clicking Format Disk.
NVR Credentials
The passwords for SupportAdmin and SystemConnect are found here. You cannot change these usernames or passwords. Icons are available to copy the username and password to your clipboard.

Enable Recording
This toggle turns recording off or on.
Overwrite Hard Drive
This toggle determines whether the NVR can overwrite old surveillance data when the hard drive gets full.
Camera Configure tab
You can customize a given camera by clicking on the camera under the Devices page and navigating to the Configure tab.
IP Settings
Click this to open a subpage where you can change the NVR’s IP address between DHCP and static. We recommend keeping gear set to DHCP and handling all IP addresses through the router.
Click Save if you made changes here.
Time Settings
In the menu at right, you choose the time zone for the camera, which affects the time that appears on channel feeds. Changes to this setting are saved automatically.
Pro Tip: Do not change the time from an x20 camera; if you change the time from the NVR, the change propagates across all x20 cameras connected to the NVR, saving you time and trouble.
Image Settings
Here you adjust the appearance of the video image.
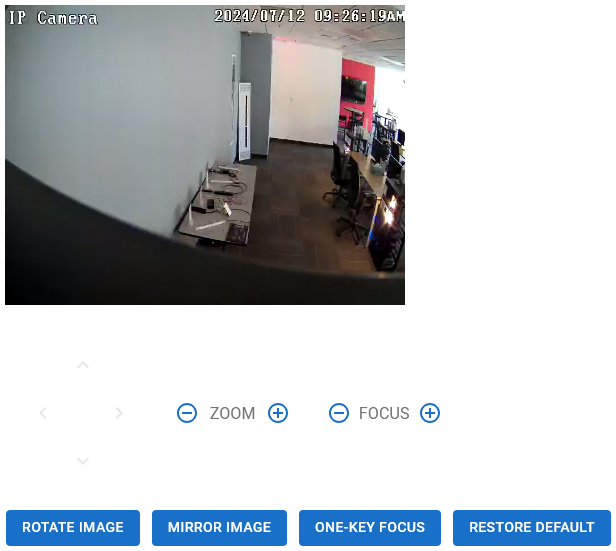
Preview area
At the top left is a view of the camera’s current image.
Below the image, if the camera is motorized, are buttons to adjust the zoom and focus.
At the bottom of the left column are three buttons (four if you have a varifocal camera).
-
Rotate Image rotates the view 90° clockwise.
-
Mirror Image flips the camera image horizontally (not accounting for any image rotation).
-
One-Key Focus appears only if you have a motorized camera model. It lets the camera use its AI to determine the best focus value. It can be adjusted from there.
-
Restore Default cancels all image adjustments ever made.
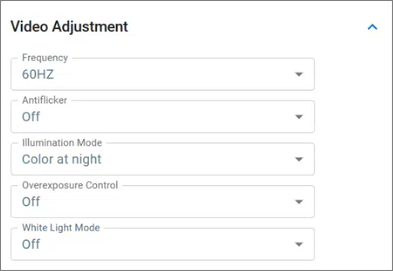
Video Adjustment
-
Frequency:
-
Antiflicker:
-
Illumination Mode:
-
Choosing Night Vision mode enables an additional Smart IR option.
-
Choosing Color at Night mode enables an additional Overexposure Control option .
-
-
Overexposure Mode:
-
White Light Mode:
Shutter Speed
Here you can manually control the mode and shutter speed for the camera.
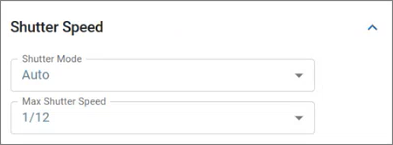
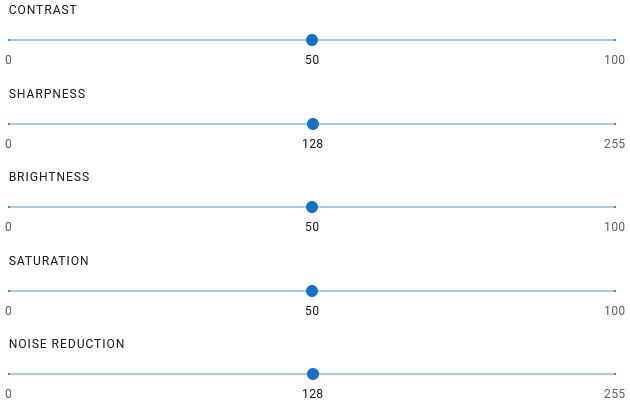
Image Quality
The right column has a number of image settings.
Image Sliders: Adjust the sliders either by clicking on the track, or clicking and dragging the dot. When dragging, the image does not change while the mouse button is down.
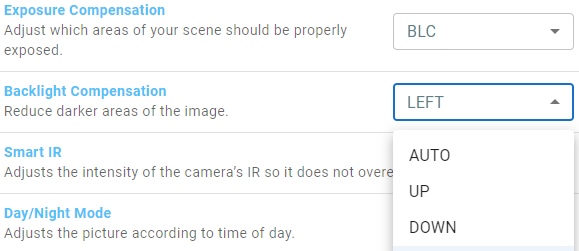
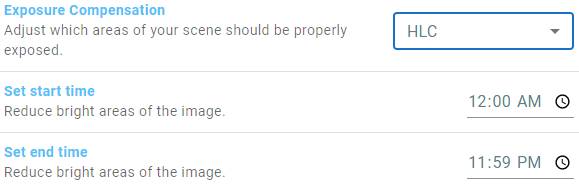
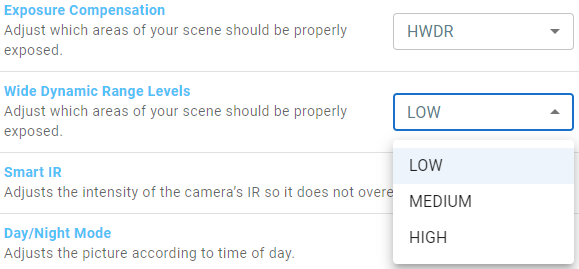
Exposure Compensation compensates for areas with uneven lighting. You can choose one of the following options:
-
BLC is backlight compensation. It adjusts for areas where the backlight is strong, making areas that are too dark brighter. When BLC is selected, a new option appears below: Backlight Compensation. Here you select which area of the screen has the backlight. To preserve a natural look, BLC affects the look of the whole screen.
-
HLC is high light compensation. It adjusts for areas where the light is too strong, making areas that are too bright darker. It is most commonly used to compensate for IR light that is too close to the subject. When HLC is selected, two new options appear below: Set start time and Set end time. Here you select when HLC is active.
-
HWDR stands for hardware wide dynamic range (that is, WDR that happens immediately, not in post-processing). If the image usually contains both bright and dim areas, this brings everything toward the middle. When HWDR is selected, a new option appears below: Wide Dynamic Range Levels. Here you choose how much HWDR adjusts the camera image.
Smart IR uses the camera’s AI to ensure the IR image does not wash everything out.
Day/Night Mode lets you (or the camera) decide how to deal with the ambient light.
IR Mode sets the method the camera uses to add IR light to boost the image visibility.
White Balance customizes the way that colors appear in the image.
Video Mask
Documentation forthcoming.
Audio Settings
Audio Alarm (select cameras only)
Note: This feature is only available on cameras with active deterrence capabilities.
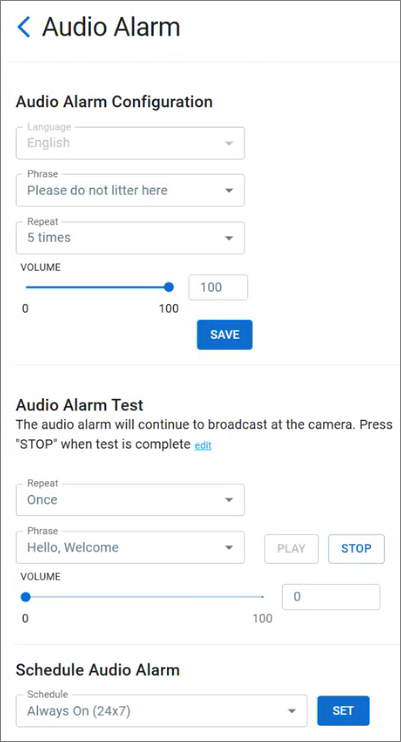
Under Audio Alarm Configuration, choose the language and set the audio message. Set the number of times to repeat the message, and select the volume. Click Save when finished.
Use the Audio Alarm Test section to determine the best volume level. The Play button is grayed out if the test volume is set to zero. Setting the test to repeat broadcasts the audio 50 times, giving you time to walk to the site if necessary (click Stop to end the test manually).
Finally, use the Schedule Audio Alarm section to adjust the times that the audio alarm is active. Click Save when finished.
Light Alarm (select cameras only)
Note: This feature is only available on cameras with active deterrence capabilities.
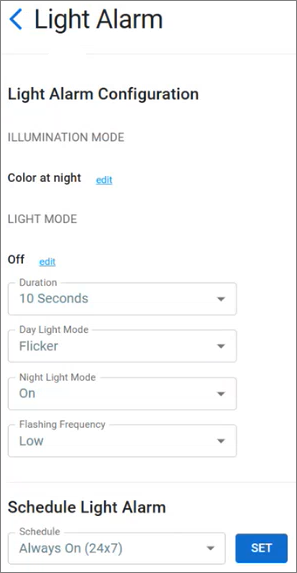
Illumination Mode shows the camera's setting. Click Edit to go to Image Settings and change this.
Light Mode shows the status of the White Light Mode setting (this is automatically off if color at night is inactive). Click Edit to go to Image Settings and change this.
Below that are settings for:
-
Duration: Choose how long the light activates for.
-
Day Light Mode (when there is enough ambient light to see color, even if the light comes from street lamps, etc.): Set the light to flash or remain illuminated. This has no effect if the light mode is set to Auto.
-
Night Light Mode: Set the light to flash or remain illuminated. This cannot be edited if the light mode is set to Auto, since the light will already be on.
-
Flashing Frequency:
Finally, use the Schedule Light Alarm section to adjust the times that the audio alarm is active. Click Save when finished.
Scheduled Reboot
Use this toggle to set a time for the camera to reboot. Use the dropdown to choose a day of the week (or all days). You can directly edit the time. Changes to this setting are saved automatically.
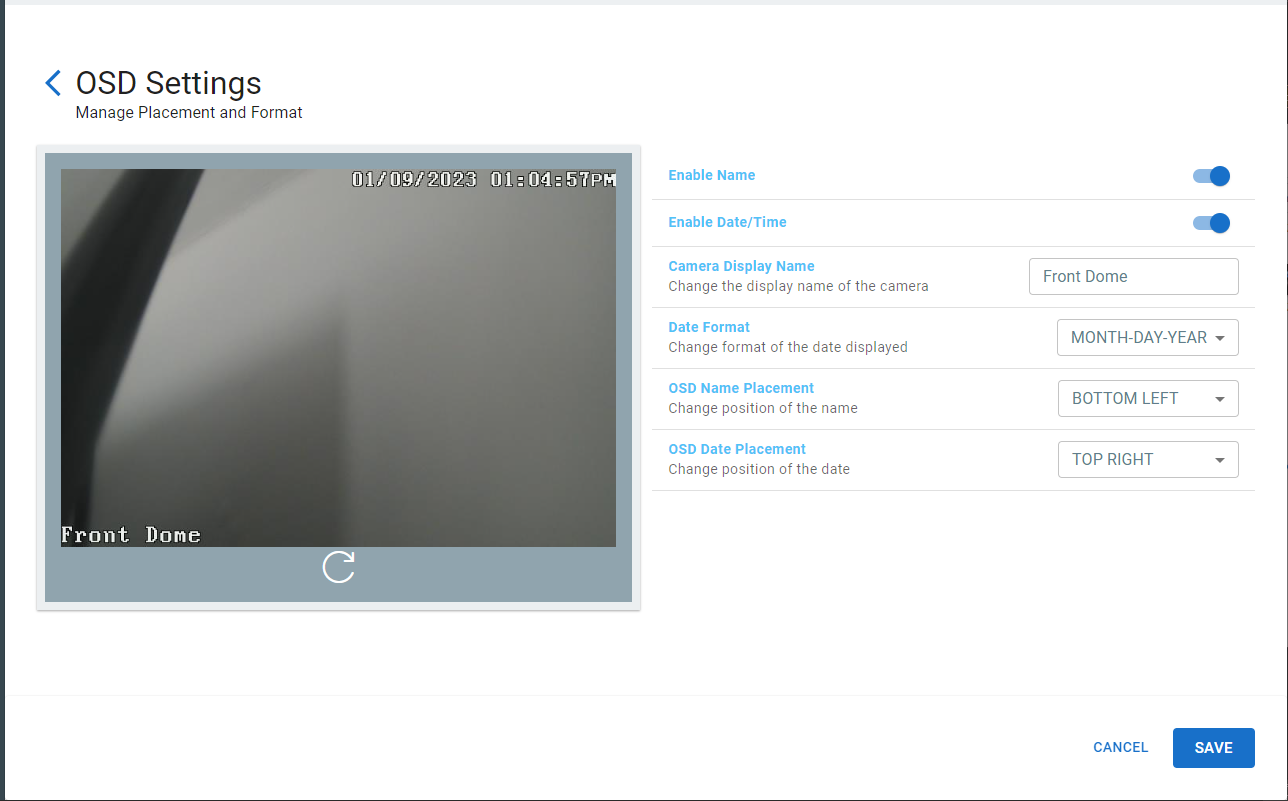
On Screen Display Settings
Here you set what additional information appears on the camera’s channel, and where on the screen it appears.
Click the refresh icon below the camera view image to reset the display to the current specs.
PTZ Settings
If this is a PTZ camera, check the PTZ Camera settings tab to see the options available.
SD Card Settings
If you installed an SD card in the camera, you can customize its use here. The SD card is used only for scheduled recording only; it does not record motion or AI events.
Changes to these settings are saved automatically.
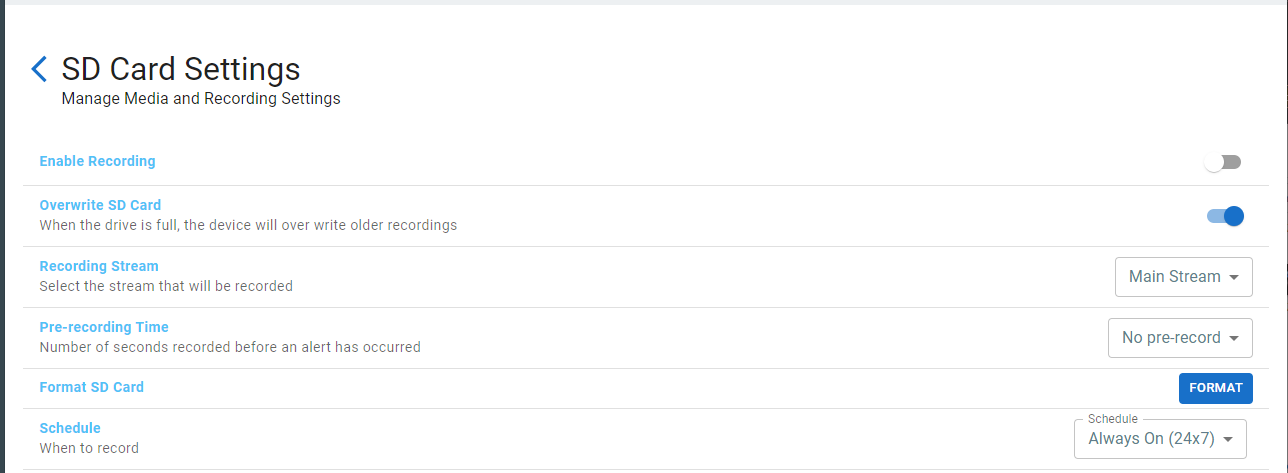
Enable Recording: This toggle determines whether or not you use the SD card.
Overwrite SD Card: Here you decide whether the camera will overwrite old data on the SD card when it gets full.
Recording Stream: Choose which stream you want to use. The main stream is the full resolution feed. The sub stream is a lower-resolution stream used when viewing multiple cameras simultaneously on the NVR or through LumaView. The third stream is optimized for use with control systems, and is typically the stream with the lowest bandwidth.
Pre-recording Time: The camera always has several seconds of current video in memory; it uses this to analyze for motion. When motion is detected, the camera can add a few seconds of this video to the start of the motion recording to provide some context.
Format SD Card: Click Format to prepare a new SD card for use.
Schedule: Here you choose when you want the video feed to be recorded to the SD card.
Camera Credentials
The passwords for SupportAdmin (your technicians) and SystemConnect (used by control systems and non-Luma NVRs) are found here. You cannot change these usernames or passwords. Icons are also available to copy the username and password to your clipboard. For additional explanation on users, roles, etc., see this article in Tech Community.
Video Quality
Use the dropdown to adjust the video quality to the network capacity. Changes to this setting are saved automatically. The Custom option activates if you make changes to the stream in the camera’s or NVR’s web interface.
Microphone / Audio Input
OvrC detects the camera model. If the camera has a built-in microphone or a microphone jack in its tail, this section is labeled Microphone. Otherwise, it’s labeled Audio Input.
Toggle audio operation on and off here, as well as adjust sound sensitivity. Changes to these settings are saved automatically.
Apply Video Quality Settings
This applies the Video Quality setting (above) to all x20 cameras that you select.
Camera Details tab
You can customize the operations of a given camera by clicking on the camera under the Devices page and navigating to the Configure tab.
The left side of this page shows a (reasonably) current view from the camera.
To the center and right, control boxes allow you to manage the following:
Activity zones
These are where the camera checks for basic motion events.
Click the toggle on the right to activate or deactivate the use of activity zones. Click the eyeball icon to display all zones currently defined (the eyeball icon does not appear if no zones are configured).
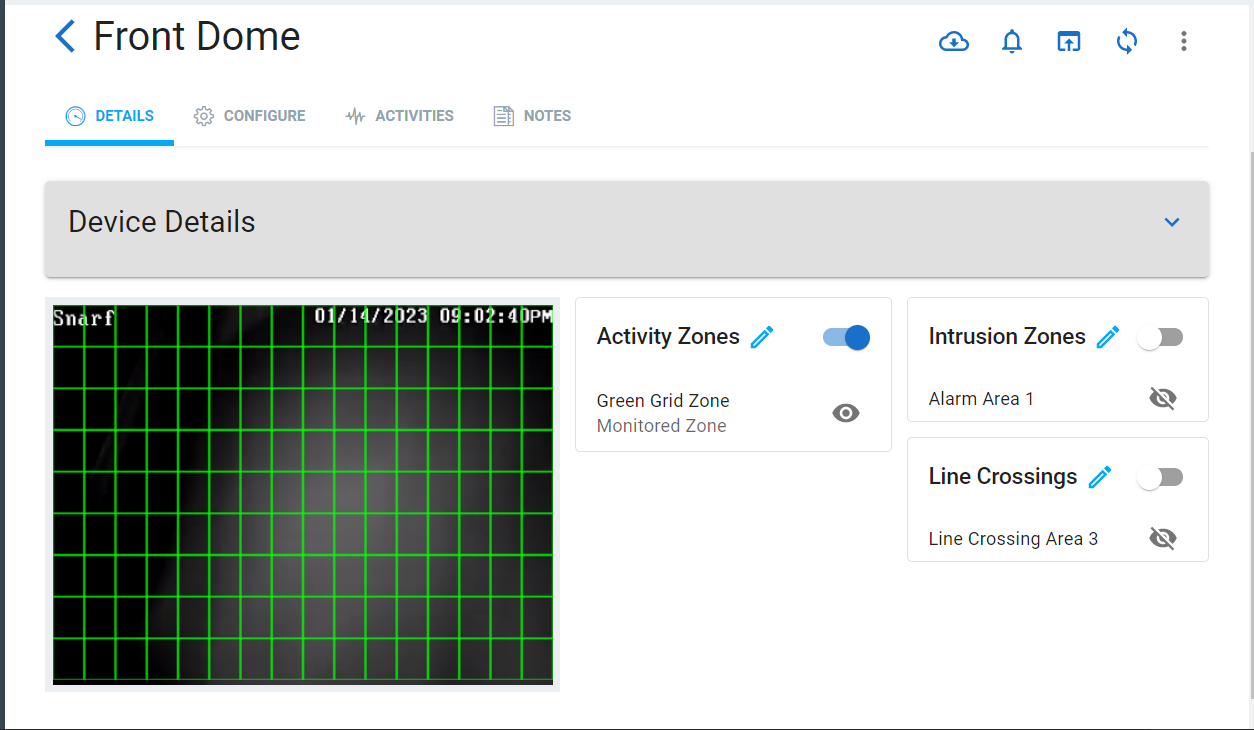
Click the pencil icon to create or edit zones. This opens the Create Activity Zone window.
The camera divides its view into a grid of squares, 9 rows tall and 16 columns wide. The activity zone is the collection of these squares that the camera uses when detecting motion.
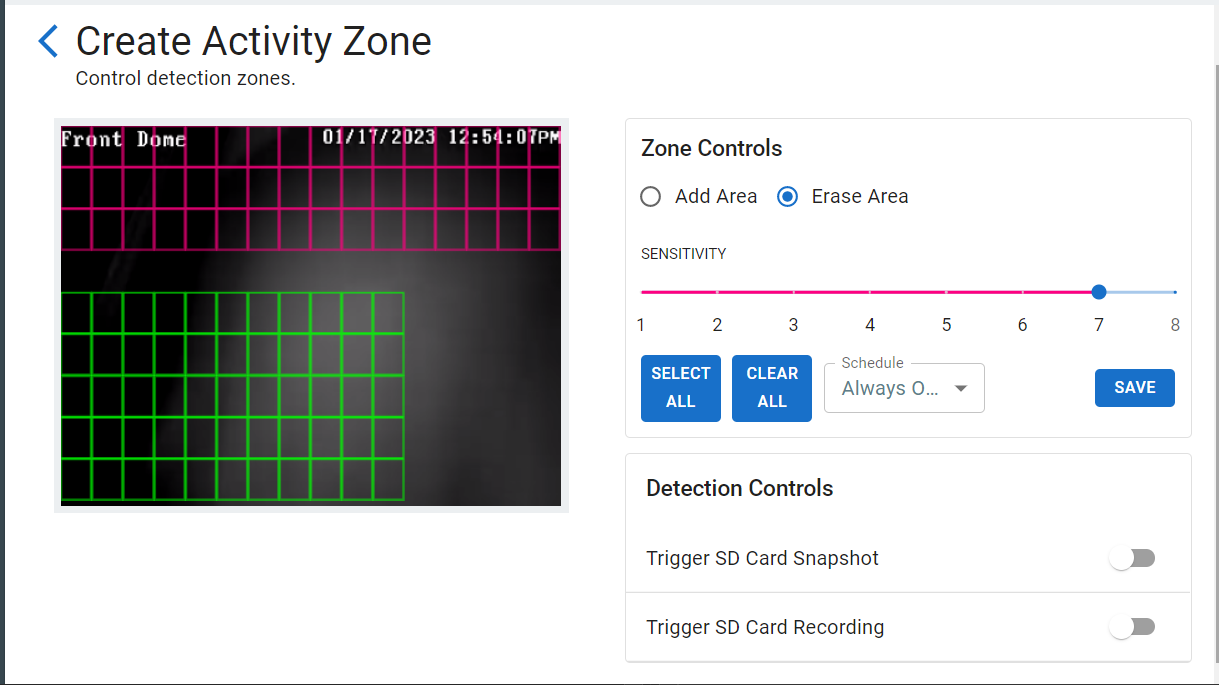
Under Zone Controls, select whether you are adding squares or removing squares from the activity zone. Click and drag in the camera view image to add or remove squares from being analyzed. Click Select All to use the entire view, or Clear All to use none of the camera’s field of view.
Sensitivity determines how readily the camera decides if something is motion. You can have multiple activity zones each using different motion sensitivities. To create such zones, first set the sensitivity level (note that the color of the sensitivity slider likewise changes as you adjust it), then draw the box. The color of the box matches that of the sensitivity level.
Note: When you open this window, the slider is always set to 4. This is because you can have multiple zones set to different sensitivities. Instead of checking the slider position, look at the color of the boxes in the camera to see determine how sensitive an area is.
Choose the schedule preference from the dropdown.
Under Detection Controls, adjust the SD settings as desired to cover for low hard disk space, or to ensure against a network outage.
Click Save before exiting.
Intrusion areas
The camera can use AI to determine whether someone enters the marked area. Intrusion cannot be used if line crossing (below) is being used.
Once you have created an intrusion zone, click the toggle on the right to activate or deactivate the use of intrusion zones. Click the eyeball icon to display all zones currently defined (the eyeball icon does not appear if no zones are configured).
Click the pencil icon to create or edit zones. This opens the Create Intrusion Area window.
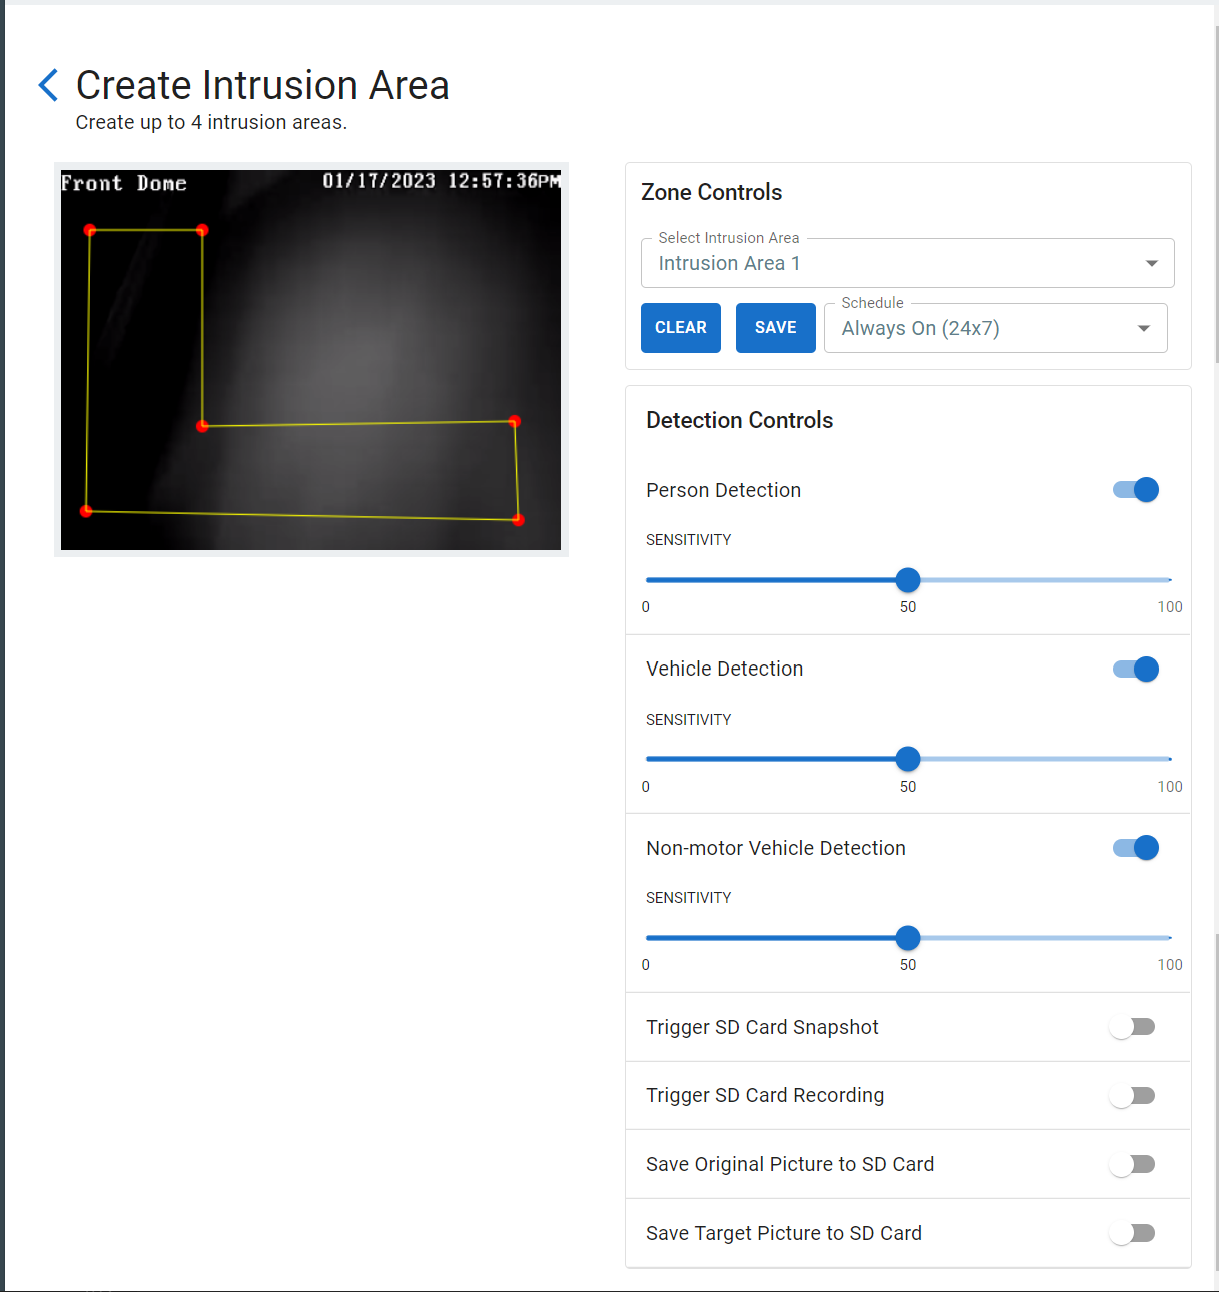
Zone Controls
Under Zone Controls, select which of the 4 zones you want to modify. Each zone has six corners; click in the camera view image to add each corner one at a time. If you want fewer than six corners, make the corners you want, then click Stop Draw. The camera will complete the shape when you click Save.
You cannot edit a zone; you must instead click Clear and start a new one.
If you don’t want to use the default of 24/7 recording, choose the schedule preference from the dropdown. Click Clear to delete the selected zone.
Detection Controls
Under Detection Controls, choose whether to analyze for people, vehicles, or non-motor vehicles like bikes. Set the sensitivity levels, then test the settings for efficacy.
Adjust the SD settings as desired to cover for low hard disk space, or to ensure against a network outage.
-
Save Original Picture: This saves the complete image of the moment that the event was triggered.
-
Save Target Picture: This saves just a cutout of the target object that triggered the event.
Deterrence Controls (select cameras only)
Note: This feature is only available on cameras with active deterrence capabilities.
This gives a summary view of the active deterrence settings. Use the sliders to activate or deactivate the light and audio alarms. The two Edit buttons take you to the Configure / Audio Alarm or Configure / Light Alarm page to edit these settings.
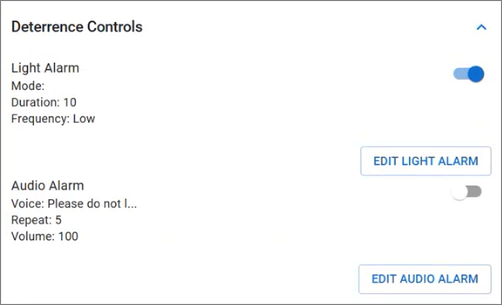
Pro Tip: The Mini PTZ has one button that takes you to a combined editing page; this will be phased out in a future firmware release to have two buttons. For information on the settings provided, use the above links.
Click Save before exiting.
Line crossings
The camera can use AI to determine whether something crosses a line. Line crossing cannot be used if area intrusion (above) is being used.
Click the toggle on the right to activate or deactivate the use of lines. Click the eyeball icon to display all lines currently defined (the eyeball icon does not appear if no lines are configured).
Click the pencil icon to create or edit lines. This opens the Create Line Crossing window.
Under Zone Controls, select which of the 4 lines you want to modify. Click and drag in the camera view image to create the line. You cannot edit a line; as soon as you click in the camera view, it erases any old line and starts a new one.
If you don’t want to use the default of 24/7 recording, choose the schedule preference from the dropdown. Click Clear to delete the selected line.
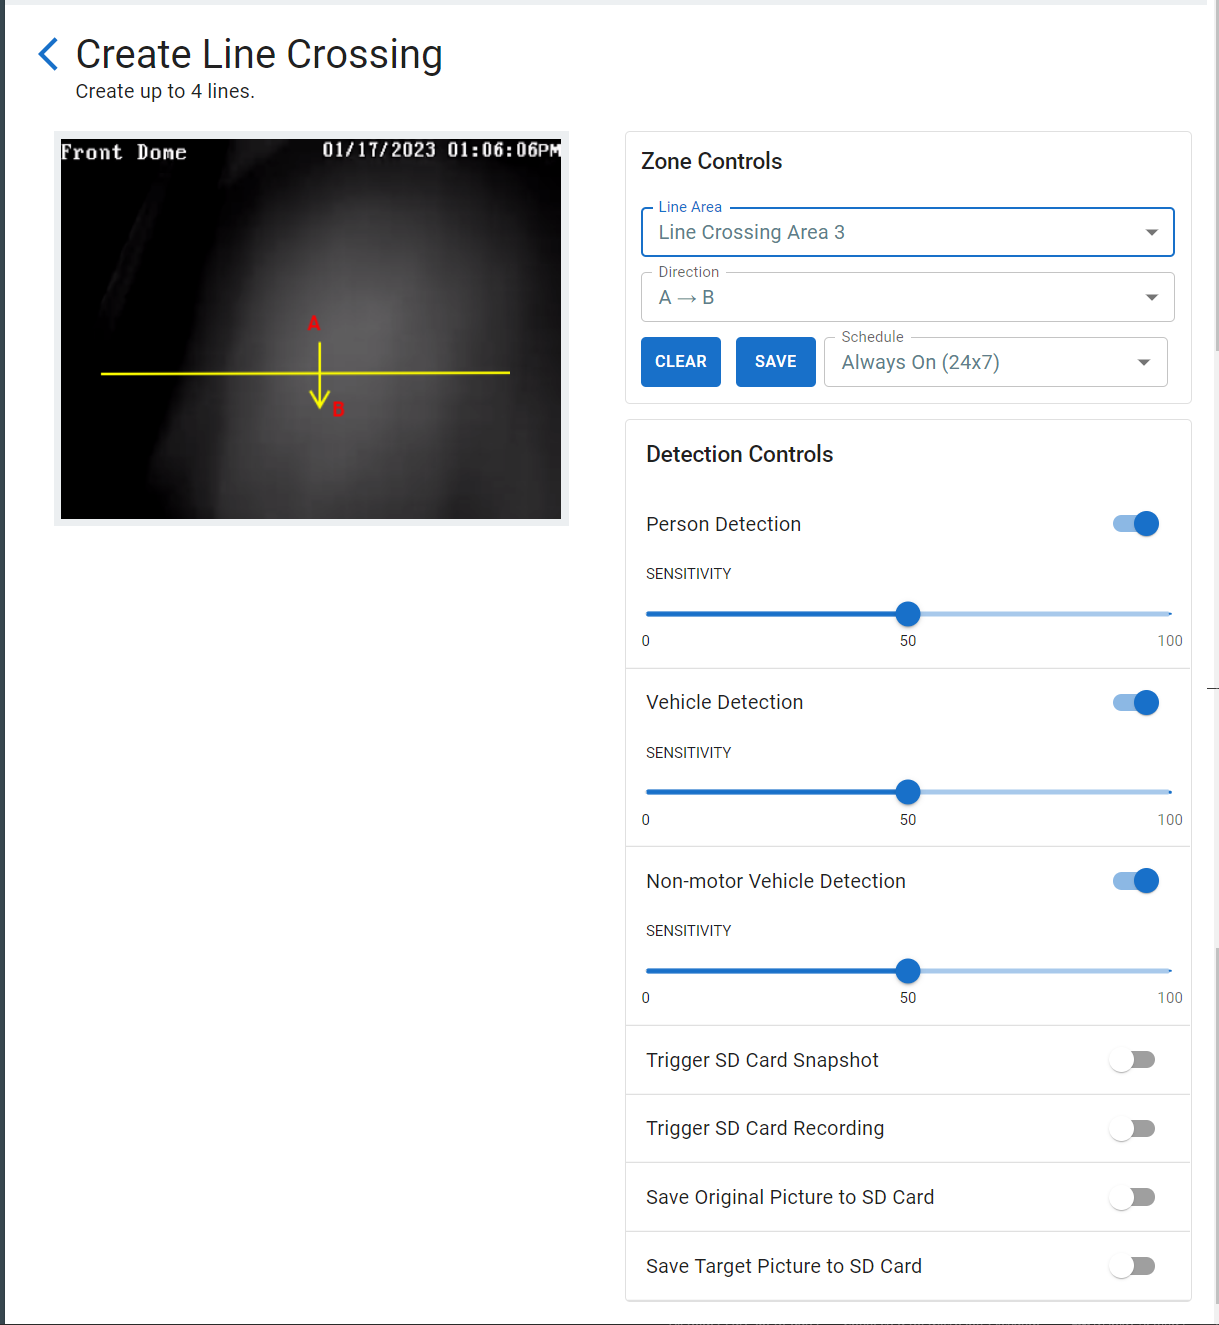
Under Detection Controls, choose whether to analyze for people, vehicles, and/or non-motor vehicles like bikes. Set the sensitivity levels, then test the settings for efficacy.
Adjust the SD settings as desired to cover for low hard disk space, or to ensure against a network outage.
-
Save Original Picture: This saves the complete image of the moment that the event was triggered.
-
Save Target Picture: This saves just a cutout of the target object that triggered the event.
Click Save before exiting.
PTZ Settings tab
To the left on this page are six tabs that cover various capabilities. The contents vary based on the tab selected.
The right side of the page shows the camera image and PTZ controls. This portion of the page remains constant no matter which tab you are on.
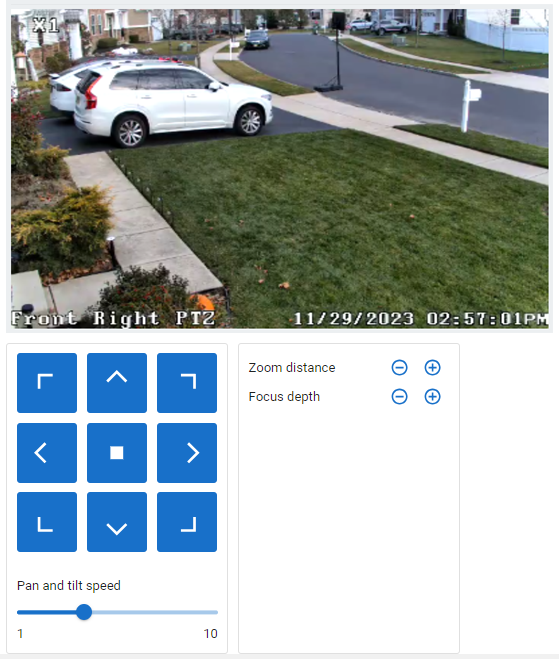
Camera image and controls
The top displays the PTZ's current view. This view does not support 3D zoom; you must use the live view for that.
The lower left features the standard PTZ control rosette; the button in the center stops the PTZ if it is moving.
At the lower right, you can set the PTZ's zoom scale, as well as adjust the camera's depth of field.
At the bottom is the speed control for the PTZ.
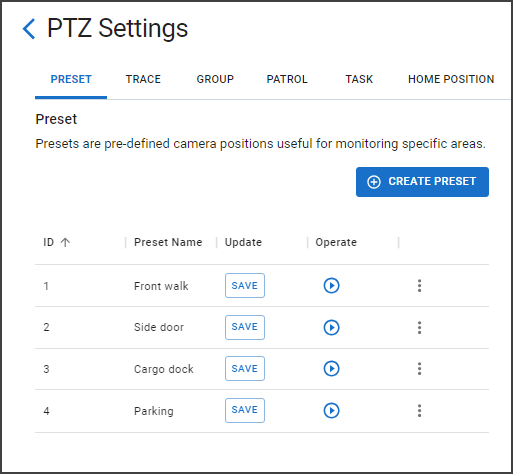
Preset
This shows the presets currently saved to your PTZ.
You can adjust a preset by maneuvering the camera using the control rosette, then clicking Save next to the preset name.
Click the play icon to move the PTZ to that preset.
Click the menu icon to open a pop-up that lets you edit the preset name, or delete the preset.
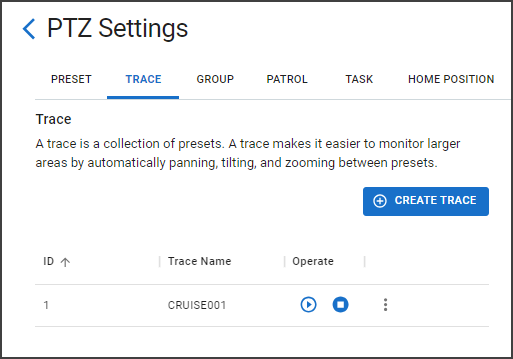
Trace
Here you create and adjust the presets your PTZ moves through. In the list, click play and stop to review each trace. Click Create Trace to generate a new one, or click the menu icon in the trace list to edit an existing one. The pop-ups are very similar.
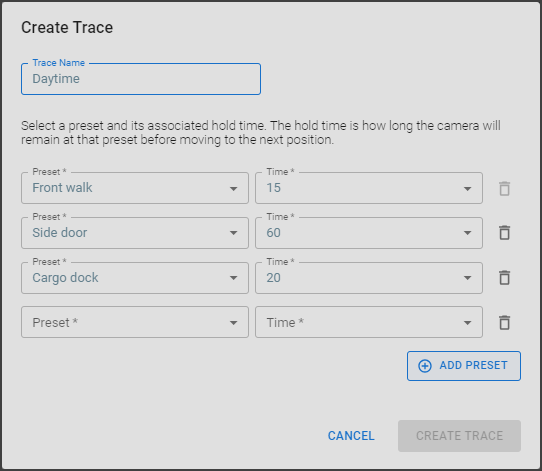
At the top, name your trace. In each row, select a trace and how long the camera lingers at that position. Click Add Preset to add to the list, or click the trashcan icon to remove a preset. Click Create Trace or Edit Trace to save your changes.
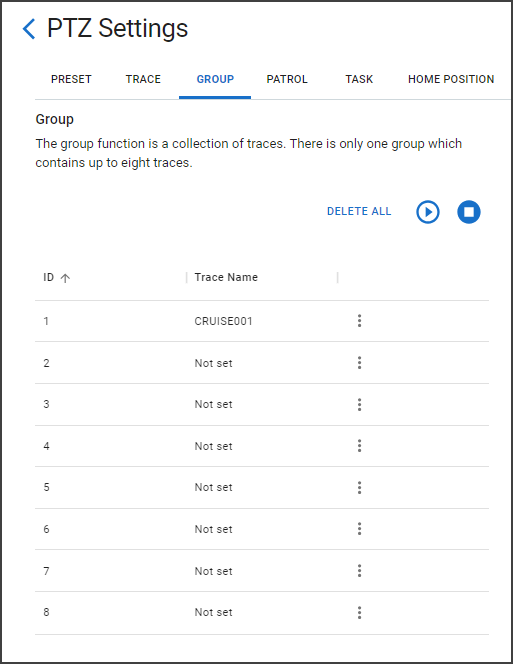
Group
Here you edit the individual traces that make up your PTZ's group. Traces are listed in order. Click the menu icon to add a trace to an empty slot, or to delete a trace from that slot on the list.
At the top are buttons to play the group, stop playing, or to delete all traces and start over.
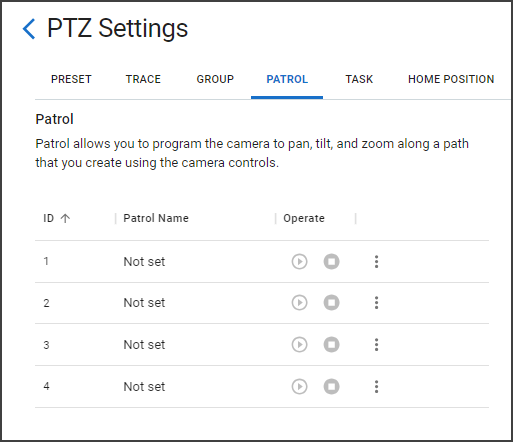
Patrol
To create a patrol, click the menu icon and select Add Patrol. The PTZ immediately begins logging all actions you use, including pausing, zooming, etc. Use the control rosette to move the camera as desired. When finished click Save next to the patrol's name.
The play button plays that patrol on an infinite loop until you press the stop button.
Task
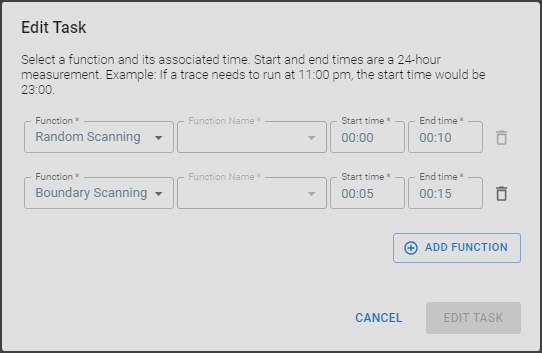
Here you edit the individual camera functions that make up your PTZ's task. Functions are listed in order. Click the Edit Task button to open a pop-up.
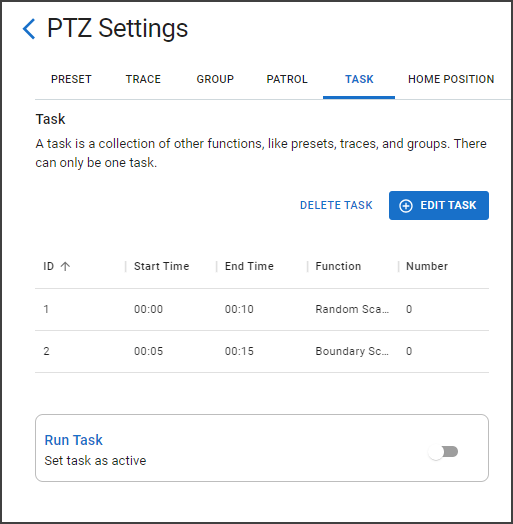
Here you customize each function, choosing a specific preset, trace, or patrol; or choosing random scanning or boundary scanning. You can also click Add Function to append something to the task, or the trash icon beside a task to remove it (you cannot delete the first task). Click in the text boxes next to each function to adjust the times that the PTZ spends on each task. Click the Edit Task button to save your changes.
At the bottom, you can set that task as active.
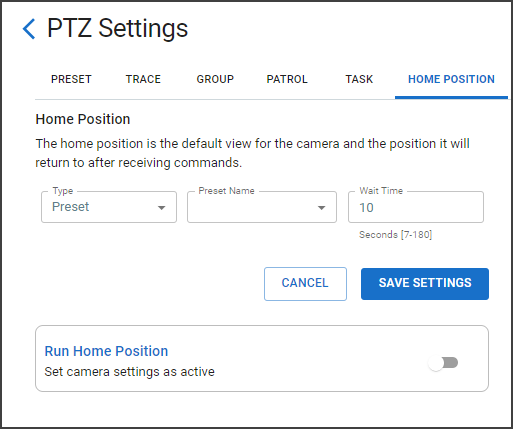
Home Position
Here you set the camera's default activity; what it does when it has nothing else to do. At the top, choose from a specific preset, trace, or patrol, or choose random scanning or boundary scanning. Set the time the camera should wait for commands before moving into its default mode.
Fisheye Special Features
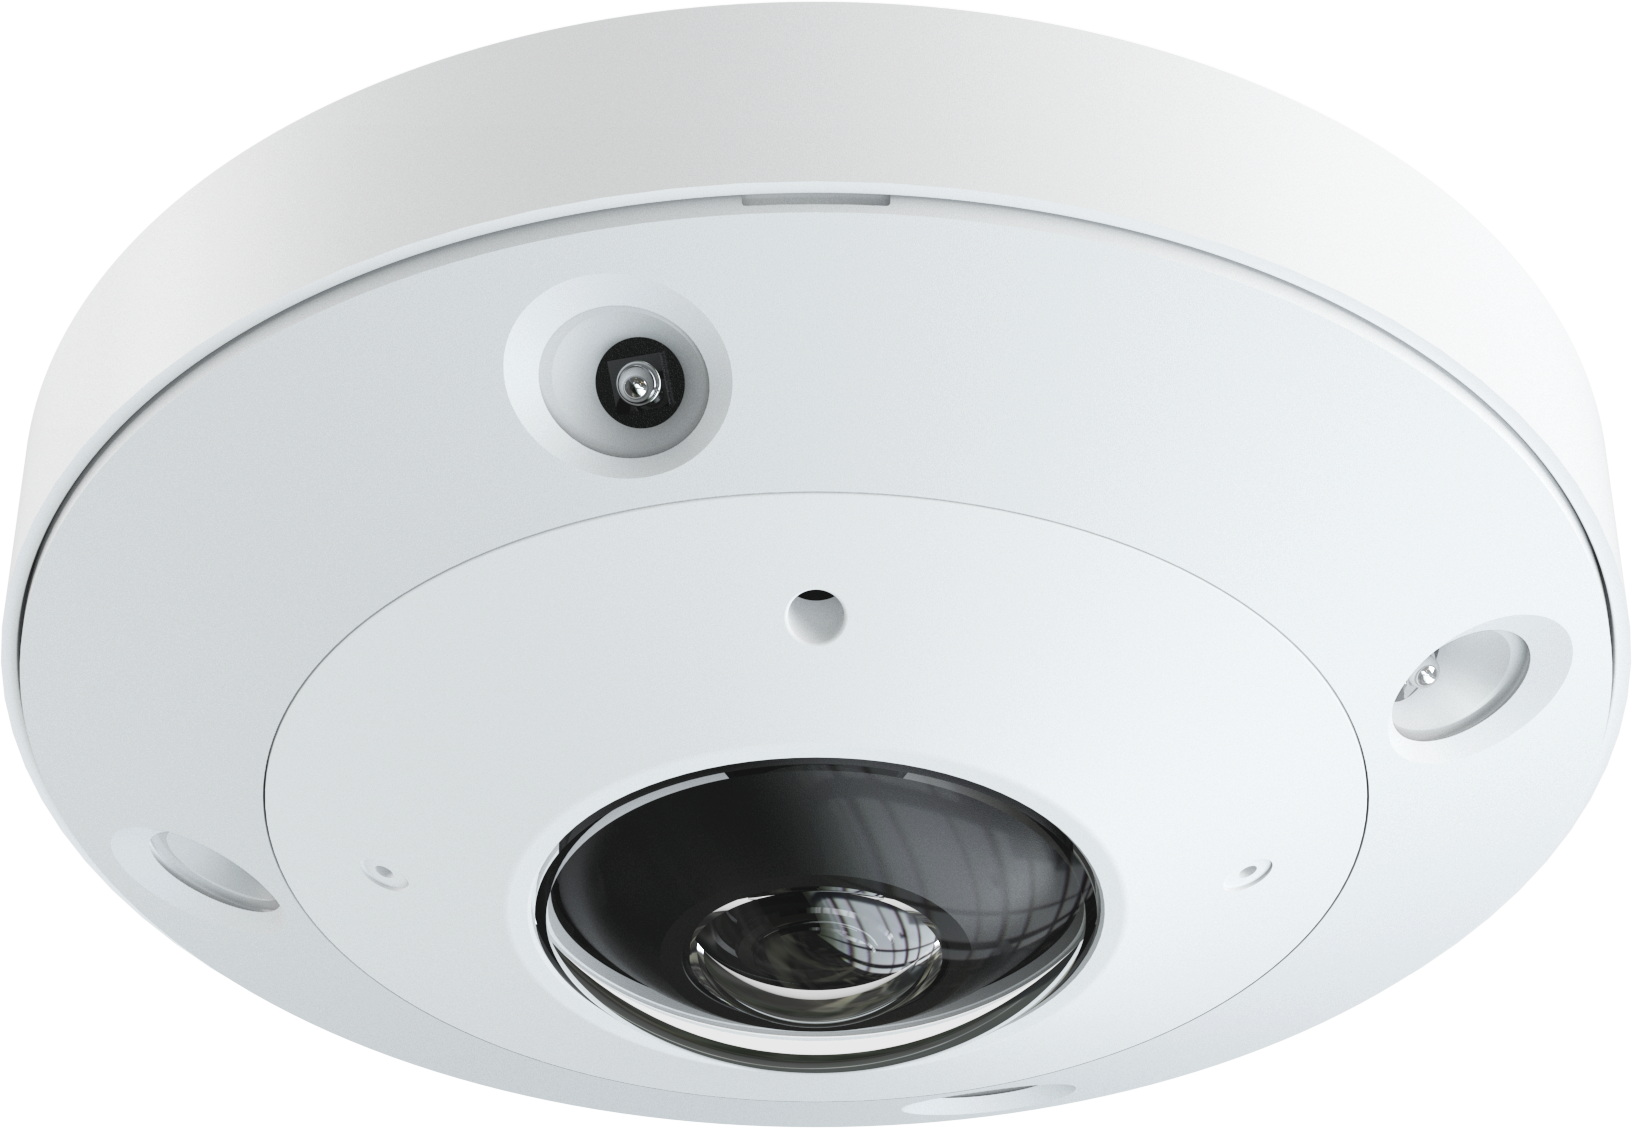
The Luma™ x20 12MP IP fisheye camera shares many general settings and features with existing Luma x20 cameras. Use this page to learn about fisheye special features.
Warning: Underpowered cameras cause serious performance issues. The Luma x20 Fisheye camera performs best with the x21 and high capacity Luma x20 NVR series.
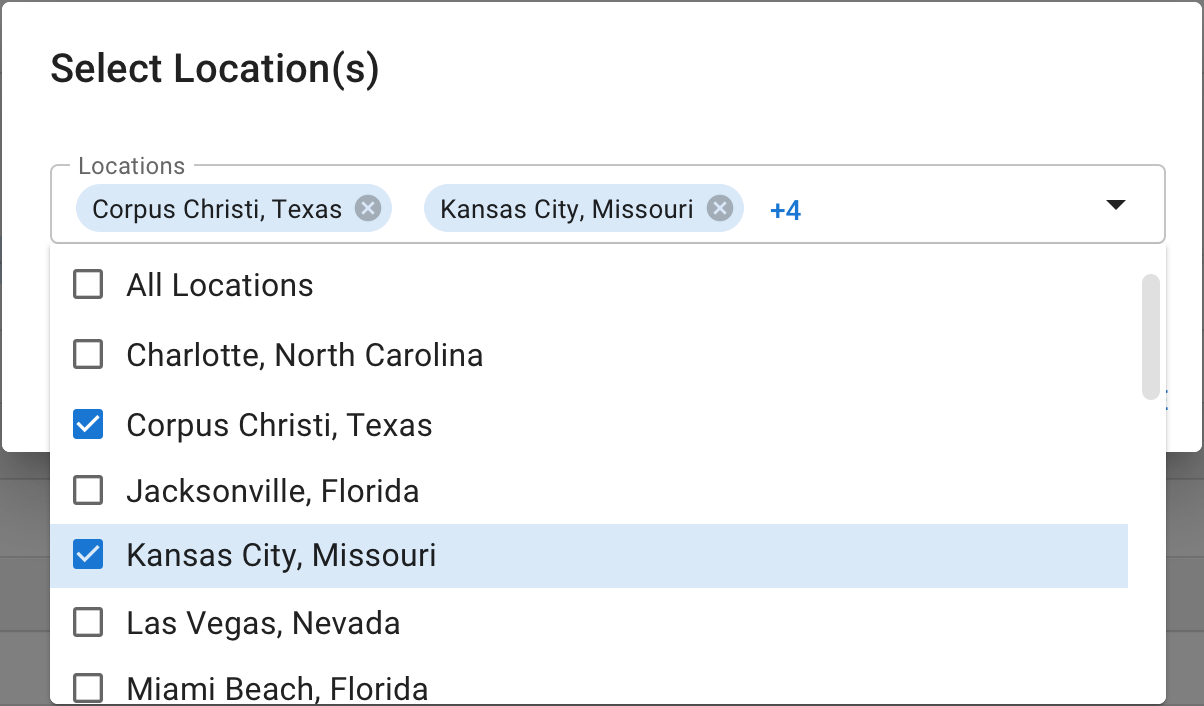
Multi-Site Management
Multi-site management allows integrators to manage large clients with multiple locations, initiating separate handoffs for each one. During the customer handoff, you can customize the accounts that get access to each location.
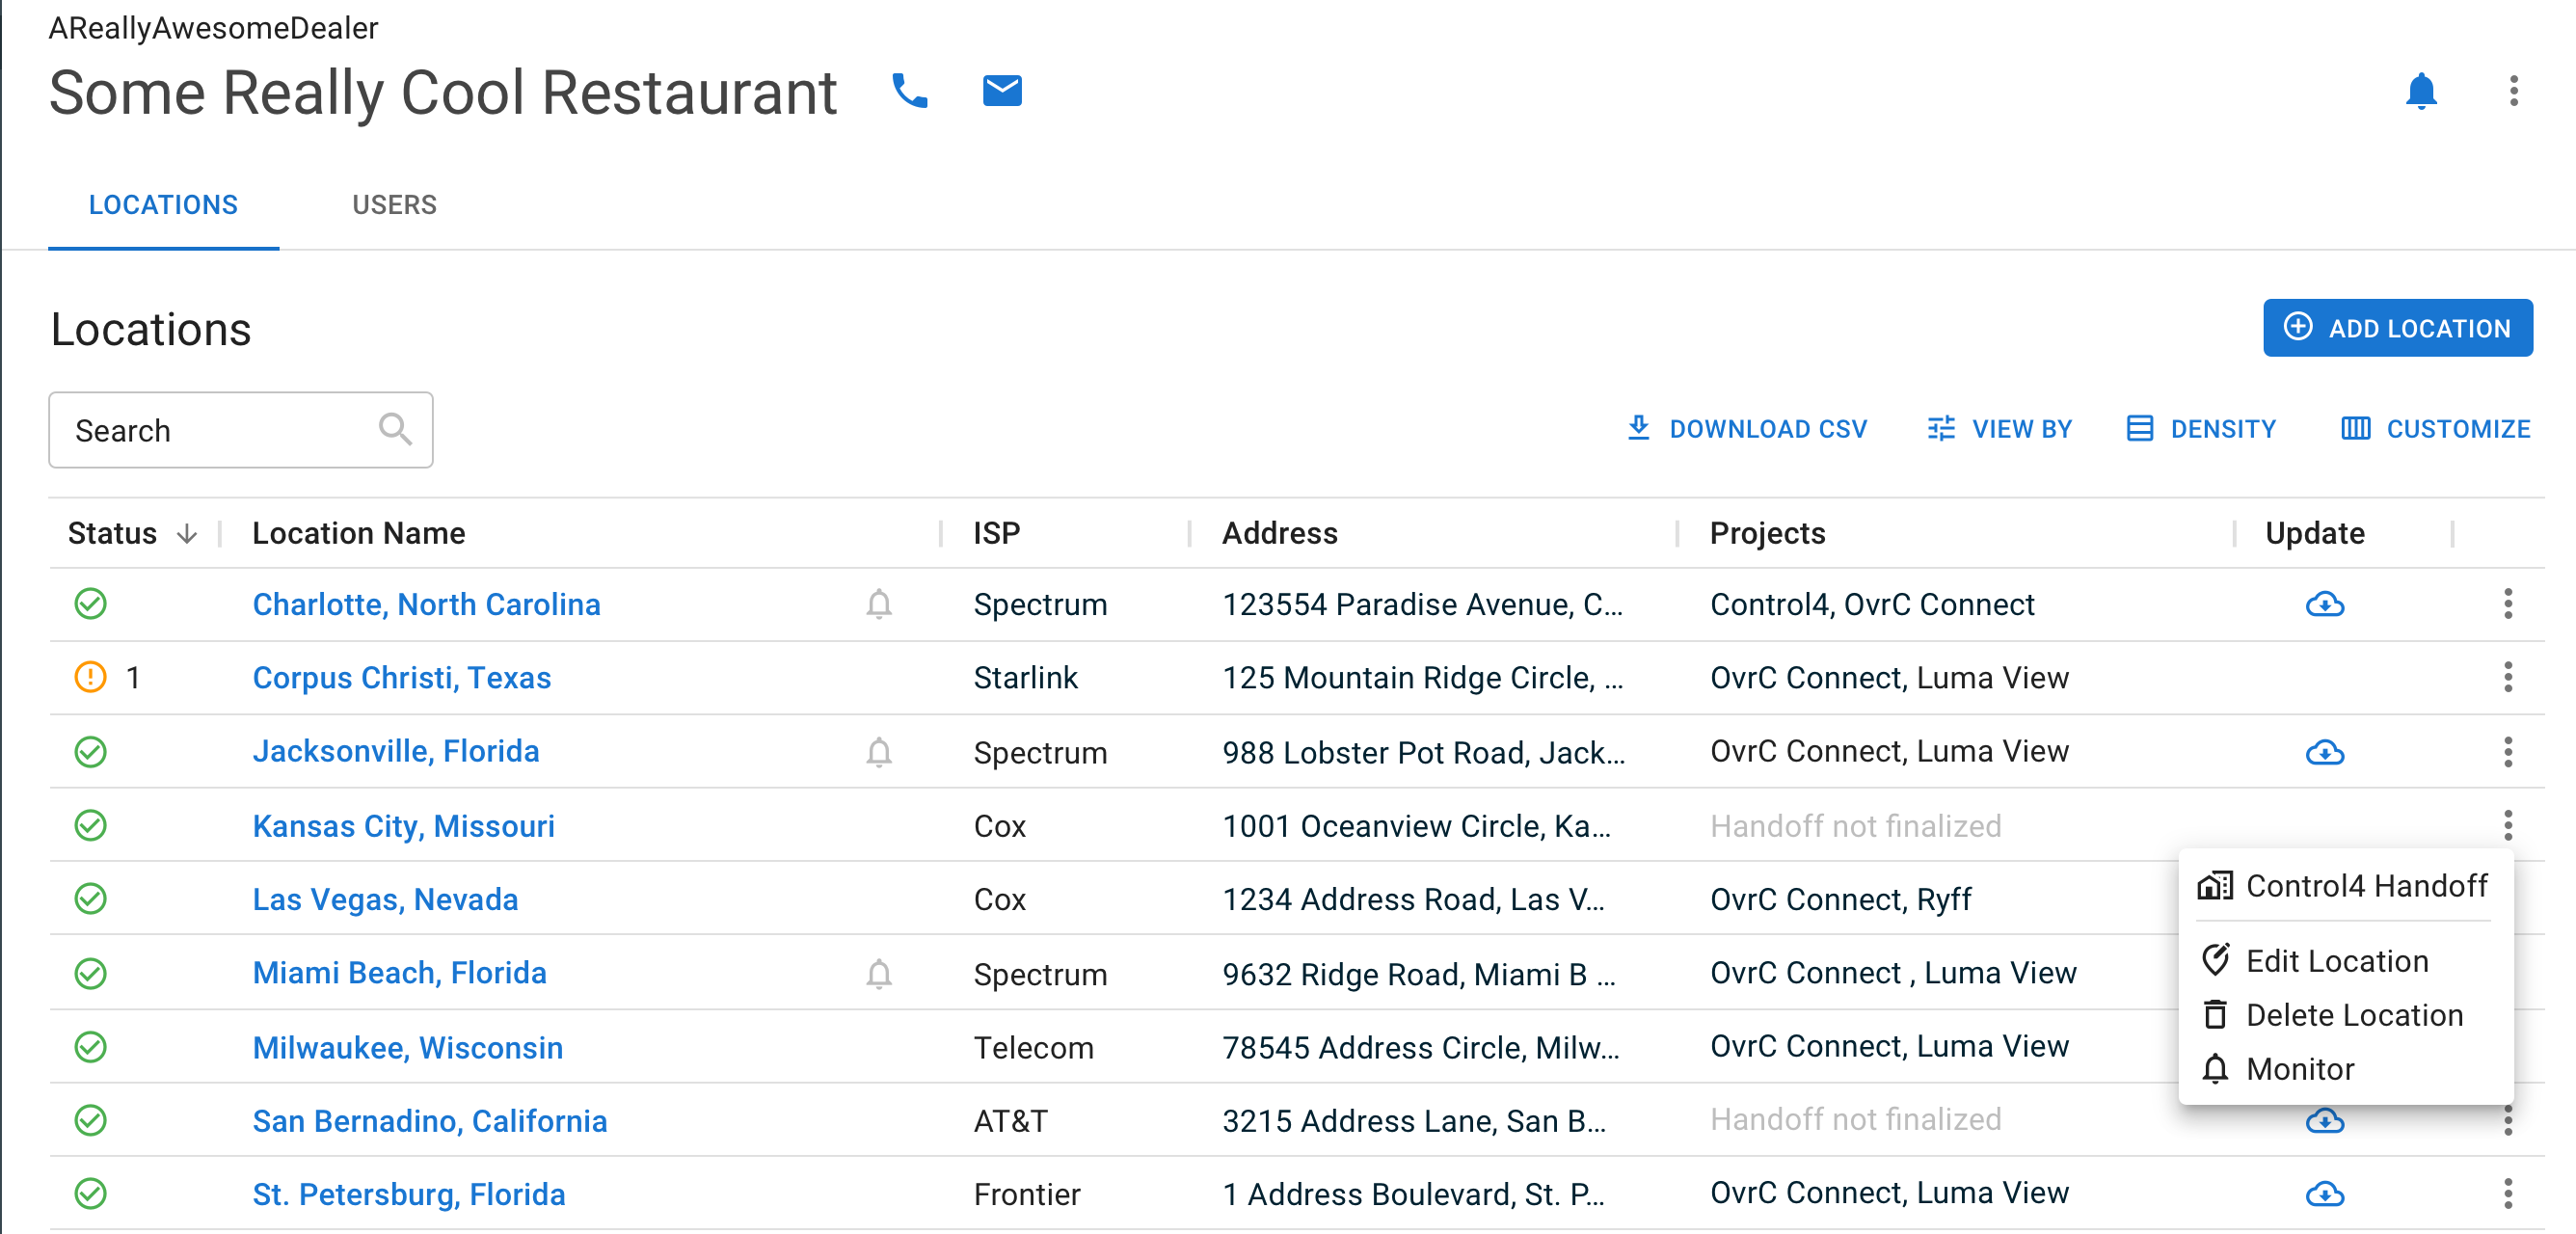
Locations tab
Each location and control system gets its own handoff. Open the menu at right, and select the handoff option (Control4 handoff shown).
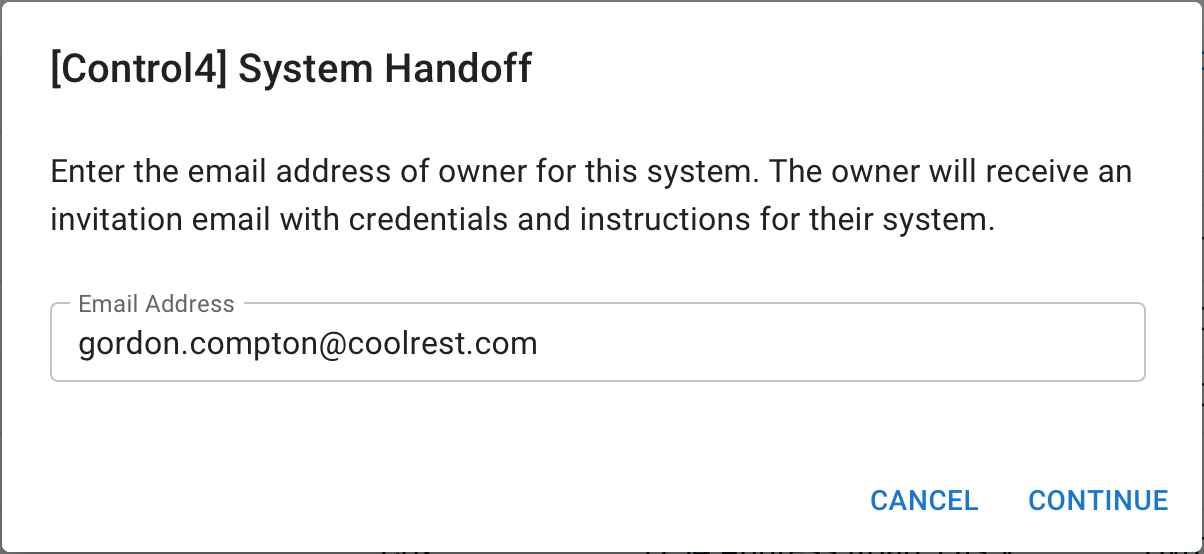
To initiate the handoff, first select the location's owner.
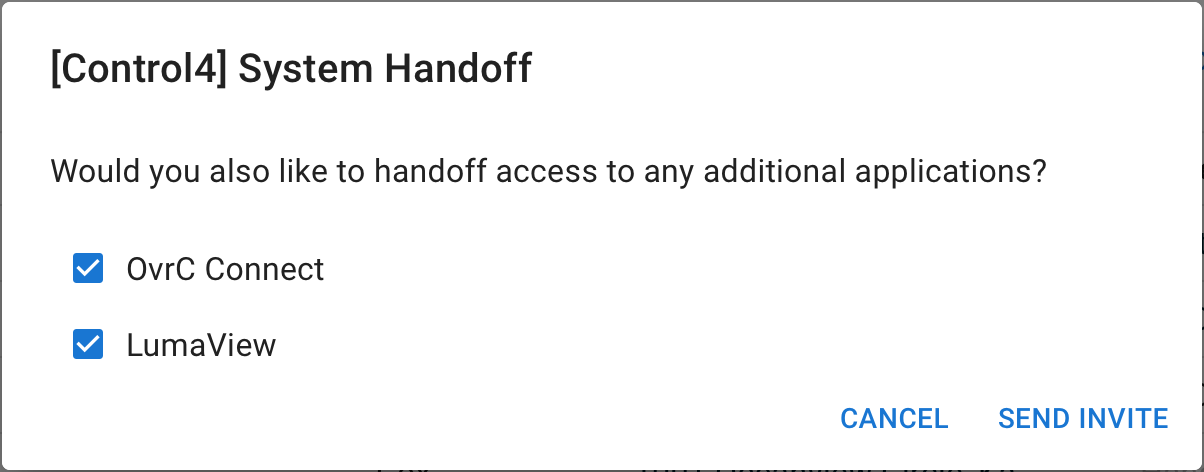
Handing off gives the owner and users access to the system, as well as any additional systems at the location that you select.
Users tab
Here you grant individuals access to any or all of a customer's locations and systems. These are entirely customizable. The table shows exactly which accounts have access to which systems at the current location.
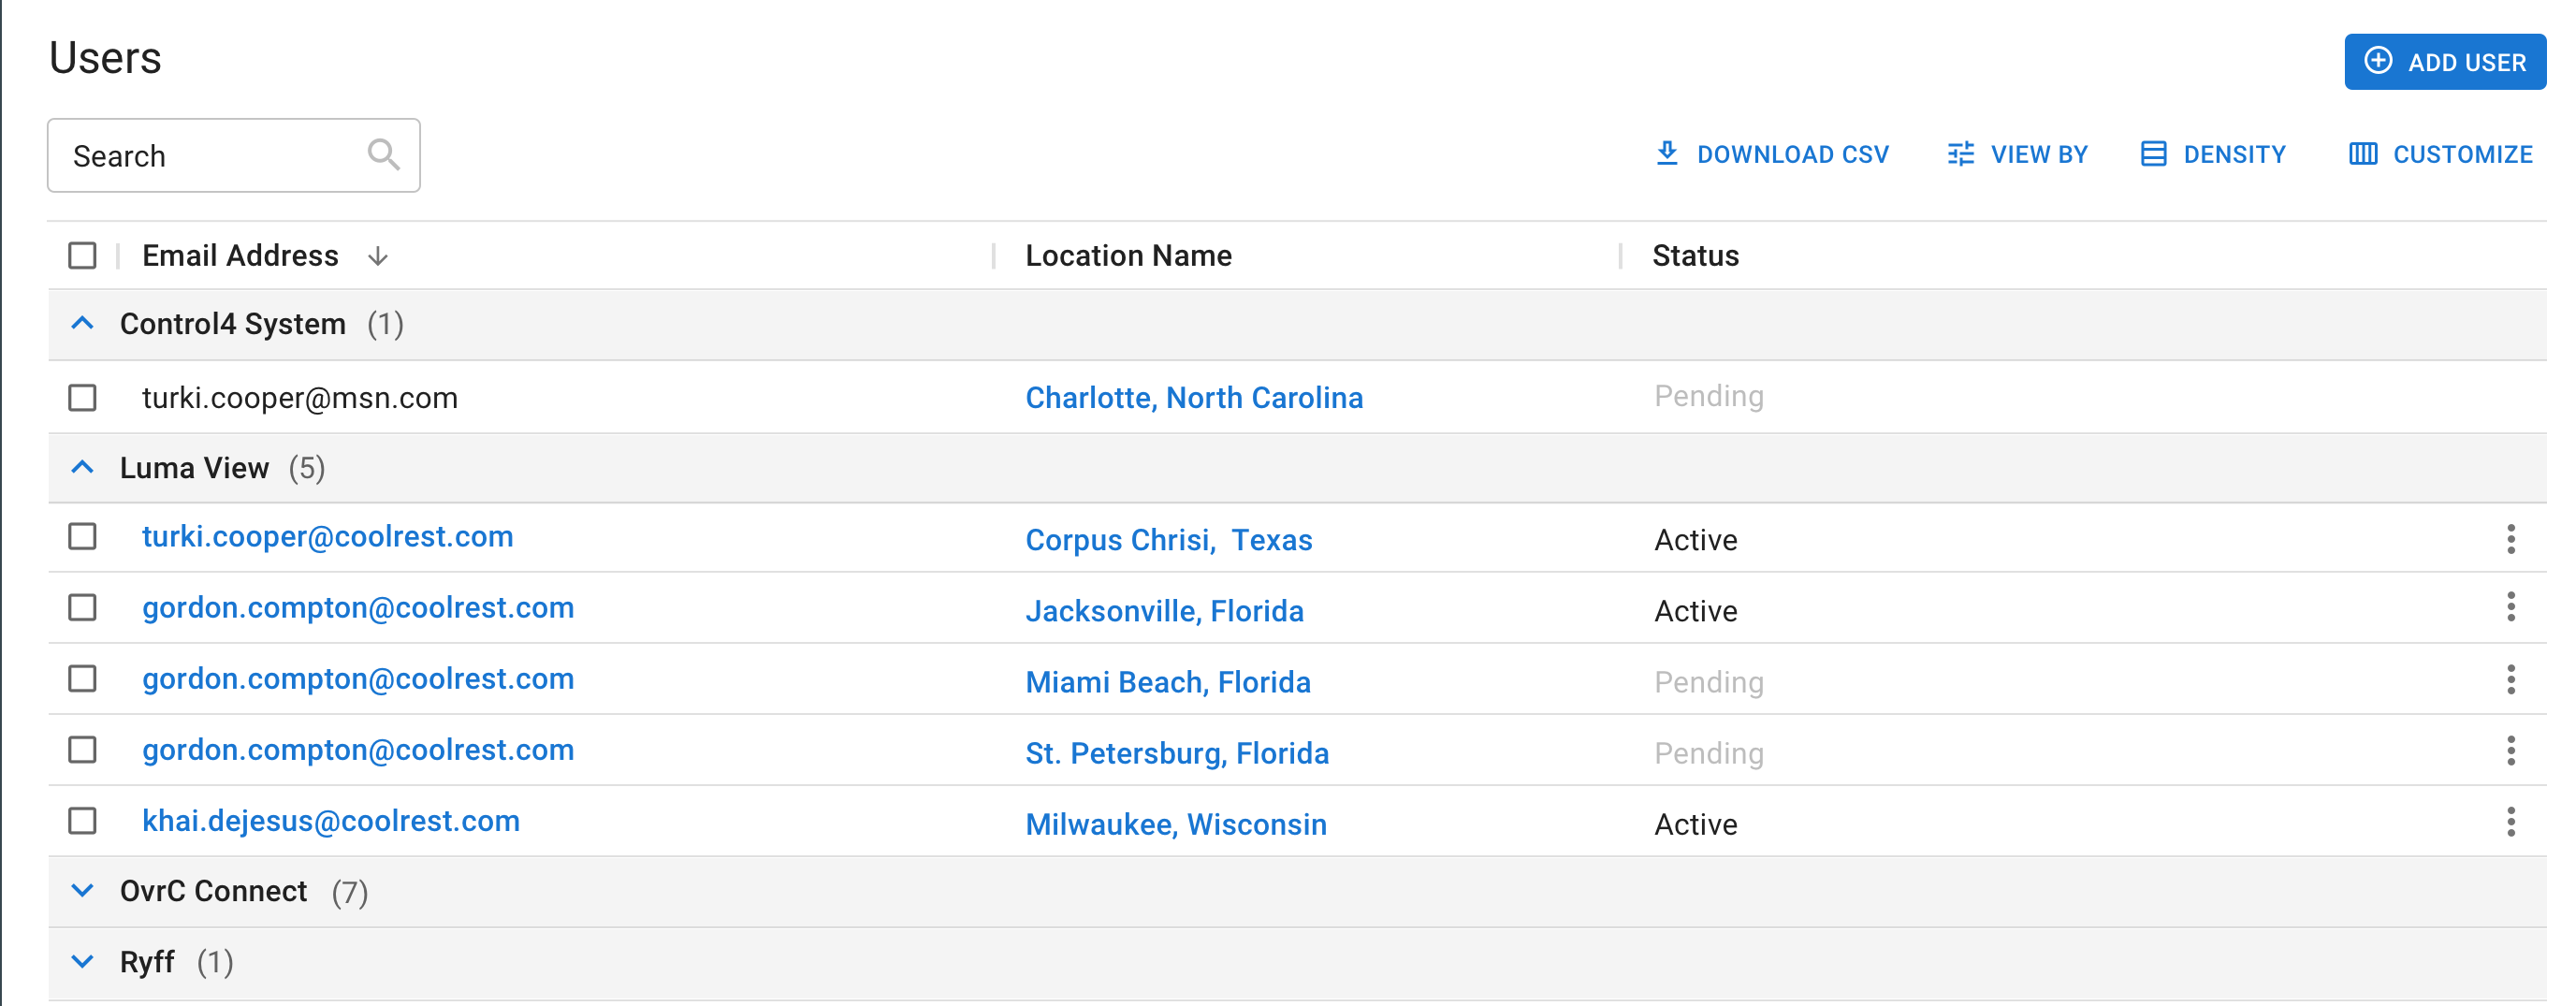
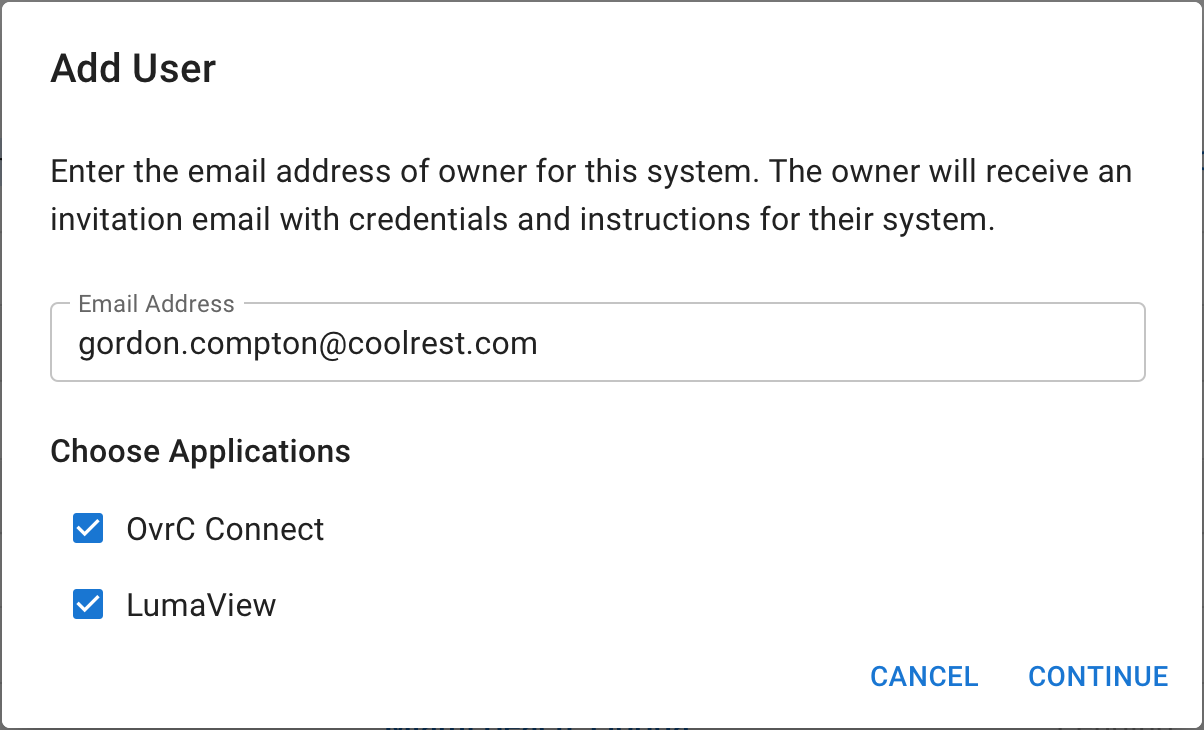
When you add (or edit) a user, first set the account email and select any additional apps for which the account is also the owner. Click Continue.
Select the locations to which the account has access.